User Guide
-
The Basics
Information about the basics you need to know to get started with Quoll Writer.
- Getting Started
- The Project Window
- Your Projects Window
- Projects Overview
- Chapters Overview
- Assets Overview (Characters, Locations, etc.)
- Scenes & Plot Outline Items
- Notes
- Tags & Tagging
- The Idea Board
- Warm-ups
- Searching
- Full Screen Mode
- Linking objects together
- Useful keyboard shortcuts
- Choosing a User Interface Language
- Changing the names of objects
- The Options Panel
- Achievements
-
Advanced Topics
Information about more topics such as importing and exporting. Using the Problem Finder or setting an edit position in a Chapter.
-
Editor Mode
Details about using Editor Mode to work with others to get feedback on your work.
Your Projects Window
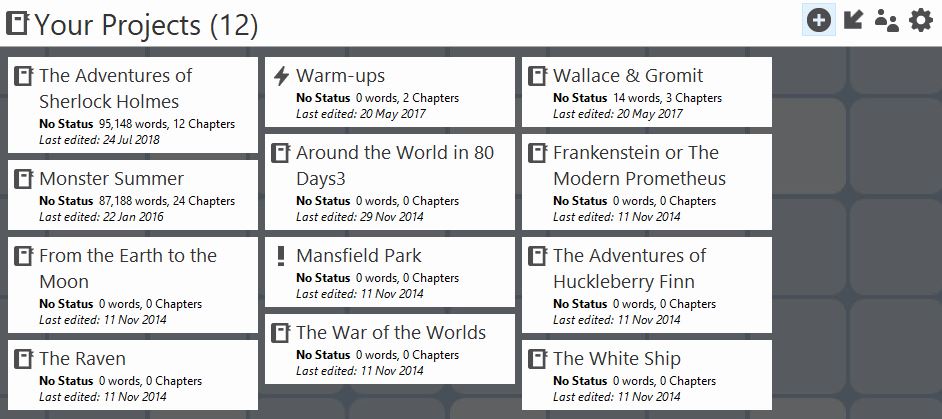
The Your Projects window is where you open and manage your Projects. It is a list of all the Projects you currently have. You can order your Projects in different ways and change what information is displayed about them.
The window is displayed whenever you want to open a Project. It will also be shown whenever you don't have a Project open. An example is shown below:
Opening a Project
Opening a Project is simple, just click on it, or if you are feeling adventurous right click on the Project and select Open.
Adding a new Project
To add a new Project you can do one of the following:
- Double click on the background.
- Right click on the background and select New Project.
- Select New Project from the menu.
- Click on the icon in the header.
Setting the status
For each Project you can set a status, to set the status right click on the Project and from the menu select one of the statuses. There are a number of preset statuses such as Complete, Editing and In Progress.
New statuses can be added/removed by selecting Manage Statuses from the menu or right click on the background and select Manage Statuses. New statuses can be added from the status menu by selecting Add a new Status.
Sorting your Projects
You can sort Projects (how they are displayed in the window) on a number of criteria:
- When the Project was last edited.
- The name of the Project.
- The status of the Project.
- The word count for the Project.
To sort your Projects either right click on the background of the window and select Sort Projects by or select Sort Projects by from the menu then select the option to sort by.
Changing what is displayed
Under the name of each Project some information about the Project is displayed. What is displayed can be configured by selecting Change what is displayed from the Project menu, the following popup will be displayed:
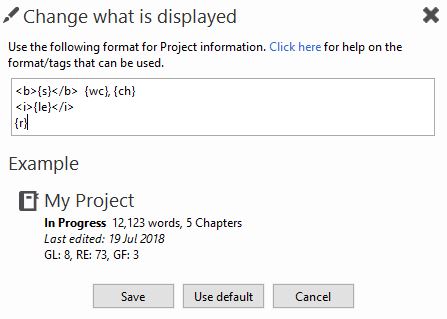
You can use basic HTML tags to provide formatting for the information, however it is recommended that you only use the following HTML tags:
- <b></b> - bold the text
- <i></i> - italicize the text
- <u></u> - underline the text
The following special values (tags) can be used to output certain information about the Project.
- {s} - the status of the Project, example: In Progress
- {wc} - the word count, example: 1,234 words
- {ch} - the chapter count, example: 3 Chapters
- {le} - date the Project was last edited, example: Last Edited: 23 Jun 2015
- {ec} - the edit complete %, i.e. how much of the Project has been marked as edited, example: 25% complete
- {r} - the readability, example GL: 6, RE: 80, GF: 8 (where GL is the Flesch-Kincaid Reading Grade Level, RE is the Flesch Reading Ease and GF is the Gunning Fog index) See the readability page for more details.
The default format used in Quoll Writer is:
<b>{s}</b> {wc}, {ch}
<i>{le}</i>
Example:
In Progress 12,123 words, 5 Chapters Last edited: 29 Sep 2015
For just the status and last edited date use:
<b>{s}</b>. <i>{le}</i>
Example:
In Progress. Last edited: 29 Sep 2015
For just the Chapter/word counts use:
{ch}, {wc}
Example:
12,123 words, 5 Chapter
To see everything use:
<b>{s}</b> {wc}, {ch}
<i>{le}</i>
{ec}
{r}
Example:
In Progress 12,123 words, 5 Chapters Last edited: 29 Sep 2015 44% complete GL: 8, RE: 73, GF: 3
Creating a Backup
To create a backup of a Project right click on the Project and select Create a Backup. You can also create a backup from The Project Window itself by selecting Create a Backup from the Project menu.
Managing Backups
You can manage your backups by right clicking on the Project and selecting Manage Backups. A popup similar to the one below will be shown:

Each backup can be used to restore the Project or the backup can be deleted.
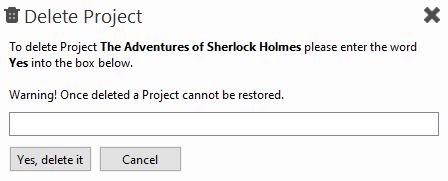
Deleting a Project
To delete a Project right click on it and select Delete. The following popup will be displayed:
Projects can also be deleted from the Project window itself.
Changing the background
You can change the background shown behind the Projects by right clicking on the background and selecting Select a background image/color.